


Are you ready for energy savings? Enable our cloud-based energy analytics and dashboard for
your Schneider
PowerLogic EGX300 Gateway , to discover, measure and verify savings in the premises you manage.
It is assumed that your EGX300 Gateway already collects data from your meter(s). If not, read and understand Schneider manuals for installing, operating, or maintaining your EGX Gateway. Installation and program procedures must be carried out and inspected by qualified personnel. Qualified personnel are those who, based on their training and experience, are capable of identifying risks and avoiding potential hazards when working with this product.
Step 1: Register your gateway and data points with AiElements
Register your Schneider PowerLogic EGX300 gateway
One of our tech support representatives will register your EGX300 gateway, will set up your monthly subscription fee, and will give you access to the AiElements dashboard. You will also receive username and password to use when setting up the gateway to send log files to the AiElements FTP server.
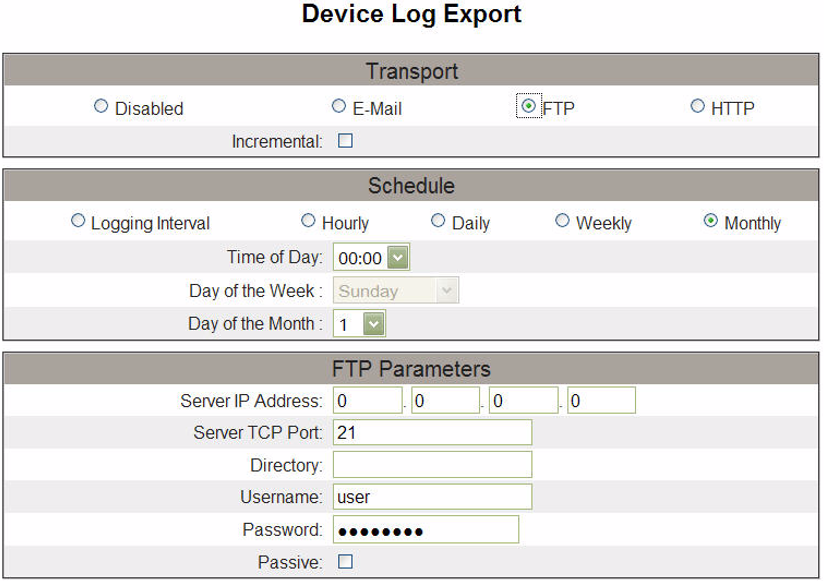
Step 2: Configure your EGX300 Gateway
The EGX300 allows you to export device logs by FTP.
1. Connect to your EGX300 webpage by entering the EGX300 IP address into a browser address bar. The default login credentials are:
-
Username: Administrator
-
Password: Gateway
2. Click on the Setup button
3. Click on the Device Log Export option
4. Select FTP as the mode of transport.
5. Enable the Incremental check box, to have the EGX push only the new data logged since the last successful upload. If the Incremental check box is not selected, the whole log file is sent via FTP on each scheduled interval.
6. Select how often the data logs are exported to AiElements: Hourly, Daily, Weekly, Monthly, or Logging interval. AiElements supports all time intervals so you can select based on your requirements.
7. Depending on which options you selected in the previous step, you may need to select the time of day, day of the week, and/or the day of the month when the logs are exported.
8. In the Server IP Address text boxes, enter ftp01.ai-elements.com
9. In the Server TCP Port text box, enter 21
10. In the Directory text box, enter source
11. Enter the username and password provided by AiElements
12. Enable the Passive check box. Sets FTP file transfer mode to passive.
13. Click Test FTP to test the FTP parameters you set. This will upload a test file onto AiElements FTP server. Once successfully tested click Apply to save the FTP Export configuration.
Your data will now be sent to AiElements, log in to your dashboard and get started!

+353 (0)1415 1242 | info@ai-elements.com |
Contact us
Anthony Schoofs
Chief Technical Officer at AiElements
Anthony drives AiElements' innovation on energy efficiency for industrial and grid environments. Anthony is also behind WSNbuzz.com, a blog covering technology advances within the smart grid and IoT markets, and was listed in 2011 amongst the top 100 IoT thinkers. Anthony was recently awarded the Globe Sustainability Research Award for his contribution to advancing knowledge on sustainability.
Latest posts by Anthony Schoofs (see all)
-
Export your AiElements data to Tableau business intelligence software - December 8, 2017
-
Connect your Schneider PowerLogic PM8000 meter to AiElements with the Obvius AcquiSuite EMB A8810 Data Acquisition Server - December 7, 2017
-
Connect your EIG Nexus 1500 meter to AiElements with the Obvius AcquiSuite EMB A8810 Data Acquisition Server - December 7, 2017