


Are you ready for energy savings? Enable our cloud-based energy analytics and dashboard for your
Accuenergy AcuLink 710 Data
Acquisition Servers, to discover, measure and verify savings in the premises you manage.
NOTE: It is assumed that the Accuenergy AcuLink 710 already collects data from meters. If not, read and understand Obvius manuals for installing, operating, or maintaining your Accuenergy AcuLink 710 Data Acquisition Server. Installation and program procedures must be carried out and inspected by qualified personnel. Qualified personnel are those who, based on their training and experience, are capable of identifying risks and avoiding potential hazards when working with this product.
Step 1: Retrieve specific information from your AcuLink 710
Check the sticker at the back of your AcuLink 710, and write down the SERIAL NUMBER.
Use your browser to connect to the AcuLink 710 configuration webpage (you can find your gateway’s IP
address on its display). Click on “Click here for System Configuration”. When prompted to log in, use
the default admin/admin credentials (or other if you have modified them).

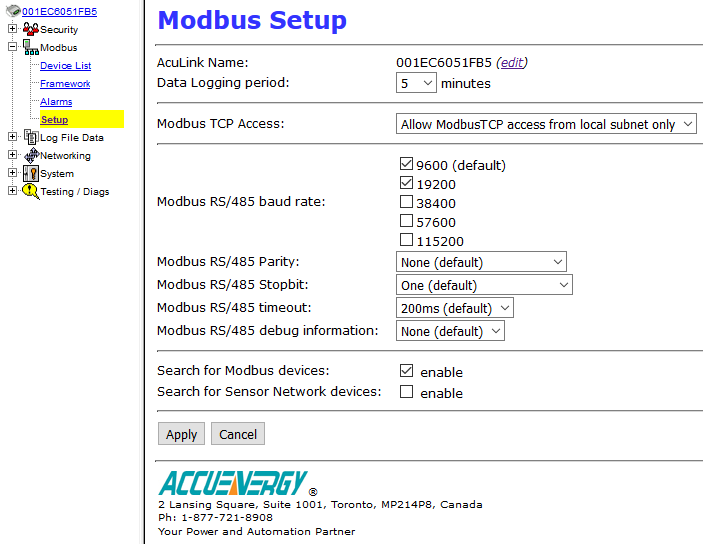
Select the Modbus/Setup section from the menu on the left.
Write down the ACULINK NAME of
your gateway. This name may be the same as the serial number, and you may edit it first if you want to
give it a name that you can remember more easily.
Write down the DATA LOGGING PERIOD of
your gateway, which indicates the sampling rate.
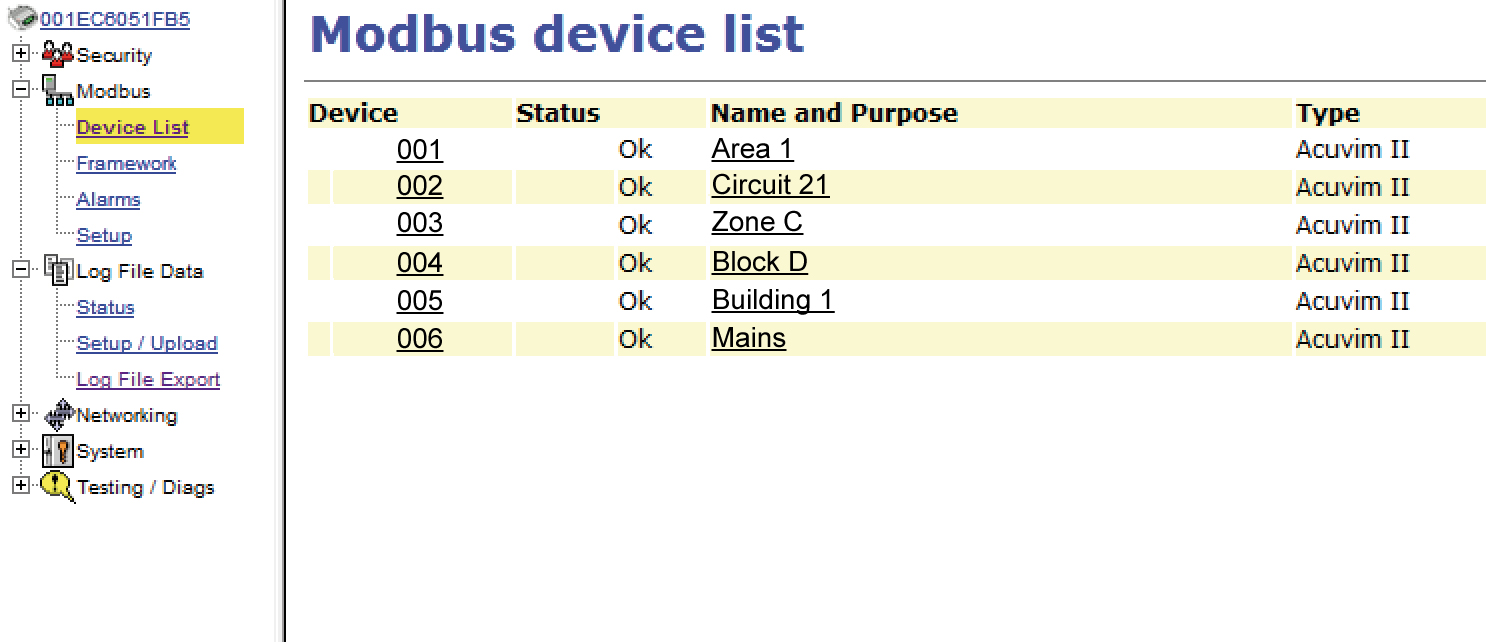
Click on Modbus/Device List, and copy for all the Modbus devices connected to your AcuLink 710 their
NAME AND PURPOSE together with their TYPE.
You should now have with you:
-
Your AcuLink 710 SERIAL NUMBER
-
Your AcuLink 710 DATA LOGGING PERIOD
-
Your AcuLink 710 ACULINK NAME
-
The NAME AND PURPOSE and TYPE of each Modbus device connected to your AcuLink 710
Step 2: Register your data logger and data points with AiElements
Register your AcuLink 710 gateway
You will need to send on the information collected in Step 1:
        - The SERIAL NUMBER of your AcuLink 710 Gateway
        - The DATA LOGGING PERIOD of your AcuLink 710 Gateway
        - The ACULINK NAME of your AcuLink 710 Gateway
        - Each Modbus device NAME AND PURPOSE
        - Each Modbus device TYPE
One of our tech support representatives will confirm your AiElements dashboard account, will set your monthly subscription fee, and will register the AcuLink 710 gateway and Modbus devices to the dashboard.
You will then receive a DATA UPLOAD PASSWORD to use in Step 3 when setting up the AcuLink 710 Gateway to send log files to AiElements Dashboard.
Step 3: Configure the AcuLink 710 to transmit to AiElements
You are now ready to set up your AcuLink 710 to send data. Select the Log File Data > Setup/Upload menu.
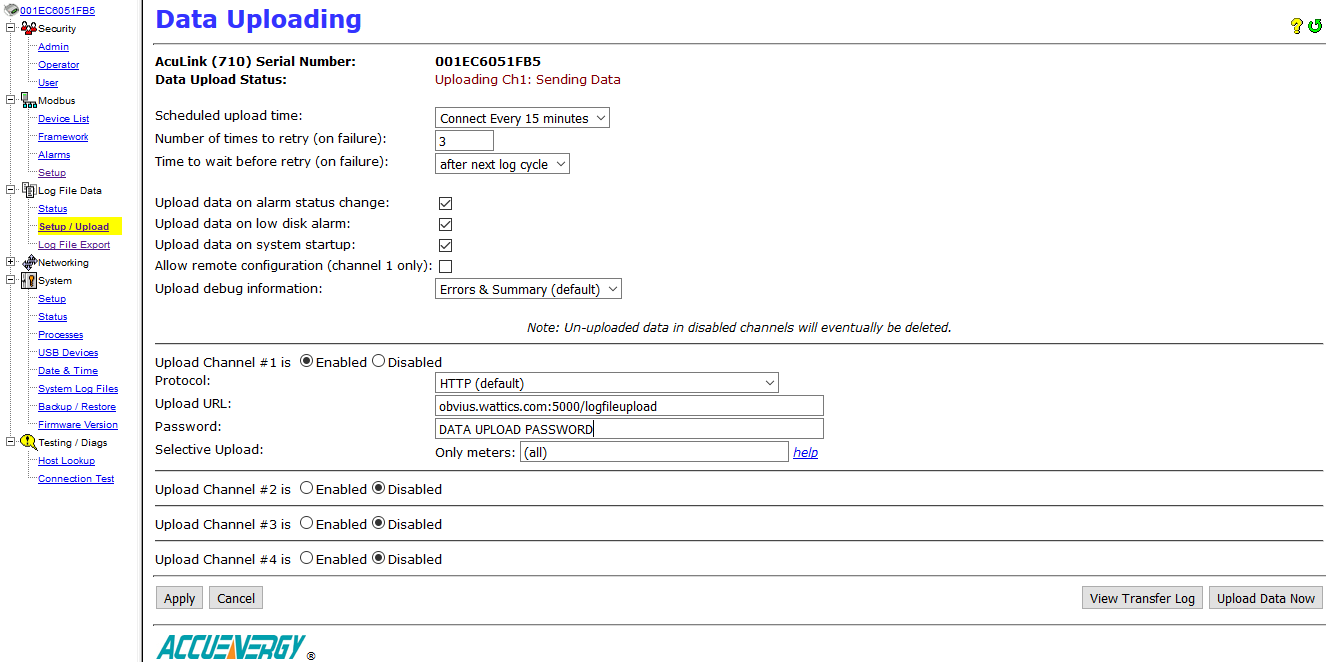
You must configure your device as follows:
-
Protocol: You must select HTTP (Default)
-
Upload URL: This is the website URL or IP to upload data to. This should be set to http://obvius.ai-elements.com/
-
Password: This password is used by the AiElements web server to verify the AcuLink 710 device authentication before accepting the uploaded data. You should input the DATA UPLOAD PASSWORD provided to you by AiElements.
Other features can be set according to your preferences, otherwise leave the default values:
-
Scheduled upload time: This option allows you to control when the AcuLink 710 will initiate the upload process. We recommend that you set an upload time greater than the log cycle, for example 15mn if you log data every 5mn.
-
Number of times to retry: In the event of a failure this option specifies the number of retries to attempt the upload again. If all retries fail, the AcuLink 710 will wait until the next scheduled upload time before trying again.
-
Time to wait before retry: In the event of a failure, the AcuLink 710 can be configured to wait for a specified period of time before attempting another connection. This option specifies how long to wait before retrying.
-
Upload data on alarm status change: This setting will cause the AcuLink 710 to initiate the upload process if any point on any Modbus device enters or leaves an alarm state. This option can be left disabled, unless otherwise instructed.
-
Upload data on low disk alarm: This feature will cause the AcuLink 710 to attempt a data upload immediately if the log file storage area is more than 75% full. This option can be enabled, unless otherwise instructed.
-
Allow remote Modbus device configuration: This feature is not supported by AiElements and can be left disabled, unless otherwise instructed.
Step 4: Start data upload
Click Apply and then the Upload Data Now button on the right to start data upload.

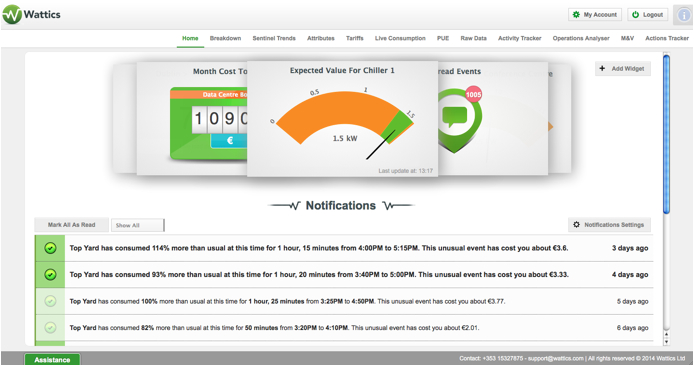
Your data will be sent to AiElements, log in to your dashboard and get started!
You don’t have yet an AcuLink 710 Data Acquisition Server?
Contact us if you would like to receive technical and pricing
information. The AcuLink 710 gateway collects and logs data from connected (wired or wireless)
devices, supporting a wide range of industry-leading protocols, and pushes interval energy use data to
AiElements via your Ethernet network.
+353 (0)1415 1242 | info@ai-elements.com |
Contact us
Anthony Schoofs
Chief Technical Officer at AiElements
Anthony drives AiElements' innovation on energy efficiency for industrial and grid environments. Anthony is also behind WSNbuzz.com, a blog covering technology advances within the smart grid and IoT markets, and was listed in 2011 amongst the top 100 IoT thinkers. Anthony was recently awarded the Globe Sustainability Research Award for his contribution to advancing knowledge on sustainability.
Latest posts by Anthony Schoofs (see all)
-
Export your AiElements data to Tableau business intelligence software - December 8, 2017
-
Connect your Schneider PowerLogic PM8000 meter to AiElements with the Obvius AcquiSuite EMB A8810 Data Acquisition Server - December 7, 2017
-
Connect your EIG Nexus 1500 meter to AiElements with the Obvius AcquiSuite EMB A8810 Data Acquisition Server - December 7, 2017